How to Compute D-Error for a Choice Experiment Using Q

D-error is a way of summarizing how good a design is at extracting information from respondents in a choice experiment.
In other articles I provide the mathematical definitions of D-error and worked examples of how to calculate D-error; but in the real world, most people will use existing tools to compute D-error. In this article I describe how to use Q to compute the D-error for a choice experiment design.
Preparing the design
The design needs to be in the form of an R output table. If the design is not already in this form, the easiest way to input external data is by clicking on Create > Tables > Enter Data in the menu at the top. This should create a new R output called table. Click on the red “Paste or type data” button on the right-hand side and a spreadsheet editor dialog box should appear.
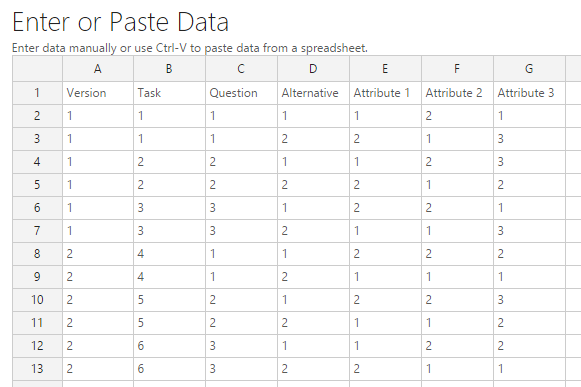
Enter the design into the cells; alternatively, they can be pasted in from Excel. The design needs to be in the form of an R numeric matrix where the first column contains the version number, the second column contains the task number, the third column contains the question number and the fourth column contains the alternative number.
The subsequent columns contain levels for each attribute, represented by numbers starting from 1. I’ve provided an example of a small design matrix — 2 versions, 3 questions per version, 2 alternatives per question and 3 attributes (2,2,3 levels) — below:
Once you have entered you design, click on the OK button and then click on the calculate button in the top right. The design should appear as a table in the output area.
Computing D-error
Compute D-error using R code through an R Output. You can create this by clicking on Create > R Output in the menu. In the R CODE box on the right, enter the following code:
</pre>

library(flipChoice)

attribute.levels <- c(2,2,3)

DError(`table`, attribute.levels, effects = FALSE)
<pre>
You’ll need to replace the assignment to the variable attribute.levels with the appropriate vector. In this example, I’ve assigned it c(2,2,3)because there are 2, 2 and 3 levels in the three attributes in the design.
I have assumed here that the R output containing the design is called table; if it isn’t, right-click on the R output, click on “Reference name…” and replace table in the code above with the highlighted name in the dialog box. Remember to keep the backticks (`) around the name. This ensures that names containing spaces or special characters will still work.
Once you have modified the R Code, click on the Calculate button in the top right, and the D-error should appear in the output. The default number of decimal places shown is 1. If this is insufficient, you can increase the number of decimal places shown via the toolbar in the top left of the window.
Note that by setting effects = FALSE, I have chosen to use dummy coding instead of effects coding. Since I have not passed in priors for the parameters, D0-error will be computed in this case.
Specifying priors
Priors are specified as an extra parameter in the call to DError. When prior is a vector of parameters, DP-error is computed. For example:
</pre>

prior <- c(0.5, 1.0, -1.0, -2.0)

DError(`table`, attribute.levels, effects = FALSE, prior = prior)
<pre>
On the other hand, DB-error is computed when prior is a matrix with two columns. The first and second columns of this matrix correspond to the means and standard deviations of the normal distributions of the prior parameters.
To find out more about Choice Experiments, head on over to our blog!