In this article, I’ll provide some guidance on how to merge data files in Q. For more on the different scenarios when this may be relevant, see my article What is data merging?
I’ll start by explaining some of the underlying theory on how files interact with Q. Then I’ll run through the instructions on how to merge in new cases and new variables.
If you are adding new respondents from the same study, then you want to merge by adding new cases. If you are including additional data for the existing respondents in your study, then you want to use the option for adding new variables.
Data sets in Q
When you work with a data file in Q, the file that contains the actual data (e.g. your .sav or .csv file), is never altered by the actions you take in the program. The original data file remains unchanged when you create new variables in Q, delete cases, or re-order variables in the Variables and Questions tab. These changes exist only in your Q project.
This is great from a risk management perspective. However, there are occasions when you want to work with the source data file. Merging data is one such occasion, which is why we will work exclusively with our data files outside of an existing project file (in case we save the wrong thing).
Merging in new cases
If you need to merge in a new wave of data to your existing tracking data file, then this is the tool to use. In the context of survey data, “cases” refers to “respondents.”
When merging new cases, both data files must be in the SPSS .sav format. The process creates a new SPSS file that contains all of the respondents from both files. To merge in new cases, where your existing data file is “File A” and the file with new cases is “File B,” take these steps:
- Open Q and load File A using File > Data Sets > Add to Project > From File.
- Go to Tools > Merge Data Files > Add New Cases…
- When prompted, click Browse for the Donor data file and select File B.
- Decide which file you would prefer in case of conflict; Prefer current file may ensure fewer issues in your Q project if there are differences between the files.

- Click Merge Files.
- You will see a large dialogue that shows which variables are matched between the files. You can drag and drop variables here to match up ones that haven’t been identified automatically, or if you know that one variable should match another but is listed as new.
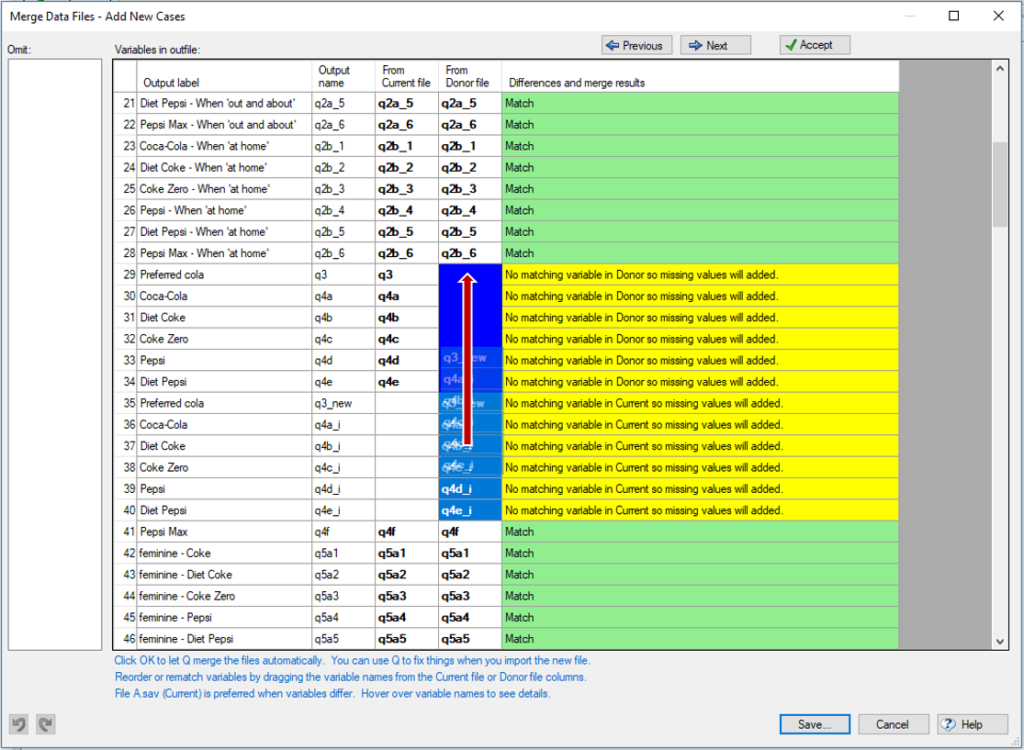
- For any conflicts, select the variable(s) and click the Accept button. If you’re unsure about a difference, then you may need to consult the source of your data.
- When done, click Save.
- Save the file using a new file name (careful not to save over any of your existing files).
- Click OK in the prompt.
- Close this project.
- Open your main project.
- Go to File > Data Sets > Update > [name of File A]
- Select the file you saved in step 10.
When merging in new cases, note that new variables will be added as part of the process (step 7). For instance, if you’re running a longitudinal (tracker) survey and have additional cases and variables, then this is the best process to use. Respondents in the current data file will receive missing values for any new variables introduced in the donor data file (and vice versa). If you’d like to remove variables from the merge, you can drag them to the Omit box on the left in the window.
Merging in new variables
If you have a file with new variables for the respondents in your study and no additional cases, then the process to use is described below. Common examples include:
- Adding coded versions of open-ended questions that you have outsourced to someone else.
- Adding additional information about respondents that you have stored in a separate database.
- Adding segments or other variables that you have calculated with another tool.
Note that unlike with merging by adding new cases, the file type for merging is not restricted to the SPSS .sav format.
However, it is vital that you have a unique ID for each case, and that these IDs are the same in the two files you’re merging. E.g. if ID 512 corresponds to “Clark Gable” then ID 512 should correspond to the same person/case in both files.
Here are the steps to take, where “File A” is your existing file, and “File B” contains the new variables:
- Open Q and load File A using File > Data Sets > Add to Project > From File.
- When prompted, select Use original data file structure.
- Go to Tools > Merge Data Files > Add New Variables…
- When prompted, click Browse for the Donor data file and select the file you saved in the previous process.
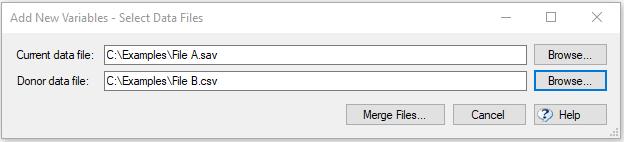
- Click Merge Files.
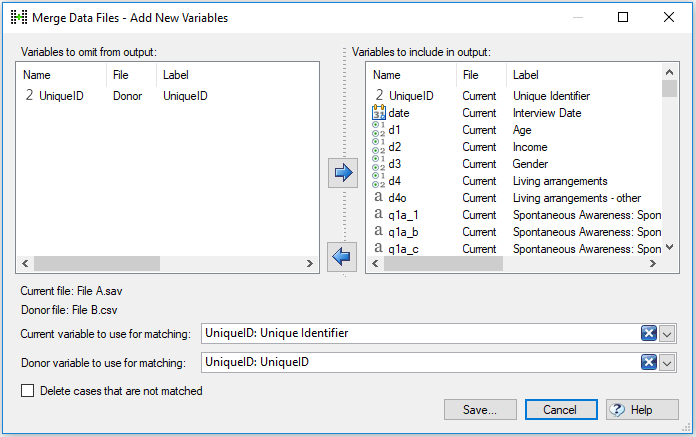
- Ensure that both Current variable to use for matching and Donor variable to use for matching are set to use the matching ID variable.
- Ensure that all variables that you want to include in the final, merged, file are present in the Variables to include in output box on the right. Any to be ignored or removed in the merge should be on the left in the Variables to omit from output box on the left.
- Click Save and save the file using a new file name (careful not to save over any of your existing files).
- Click OK in the prompt.
- Close down Q (no need to save the project).
- Open your original project in Q.
- Go to File > Data Sets > Update > [name of File A]
- When prompted, select the file you just saved in the merging process, and click Open.
- You should get a Data Difference Warning that contains a list of the variables you merged into the file. They should all be green and marked “NEW”: click Accept.
Don’t forget…
As the process of merging files and appending data can be complex, it’s always worth your while checking that the merge has gone according to plan. Double-check frequencies if you’re merging in new cases, and if you’re merging in new variables, ensure that the results in the new variables line up with the correct IDs in the merged-together file.