The Complete Guide to Market Research
Tutorial
Q Tutorial
This tutorial provides a basic overview of some of the core functionality of Q.
Importing the data into the software and creating a summary report
- Download the example SPSS data file (e.g., to your downloads folder or desktop). For survey questions and details, see the questionnaire.
- Open Q.
- Click on File > Import New Data File (New Project) and press Yes.
- Press Yes if asked any questions (these questions ask if you wish to have the data file automatically tidied; this is almost always a good idea). You will now see a table showing the average value of the surveyanalysis::ID Variable.
- Select Create > Basic Tables.
- Select all the variables on the left and move them across to the Key questions box.
- Press OK.
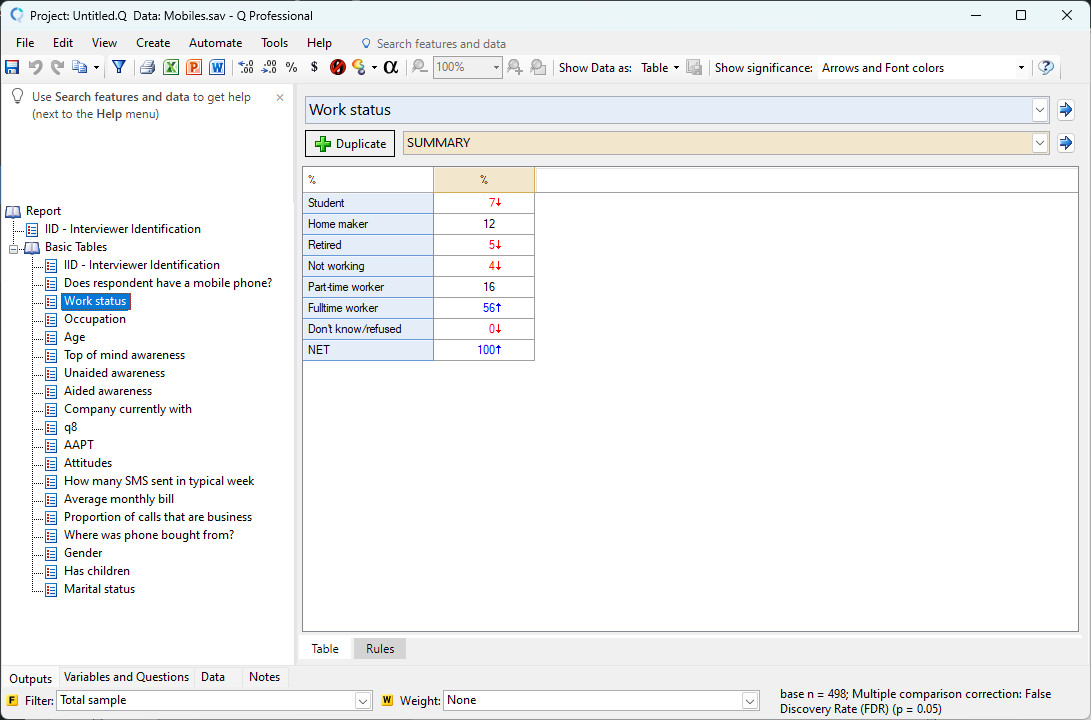
- Click on Work Status (on the left). This is the first of the tables containing interesting tables. Your screen should now look like the screen below.


Summary tables of grid questions
Grid questions are automatically identified when the data is read into Q. To see an example, click on the table q8 (shown below).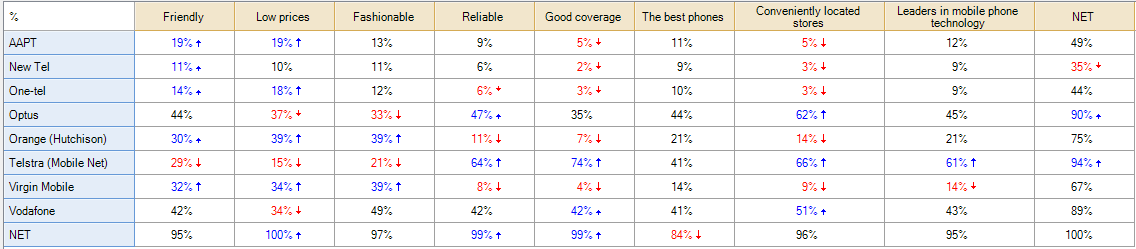
Creating a crosstab
In this example, we will create a crosstab of Unaided awareness by age:
- Press
 , which creates a copy of the current table. We will then modify this copy (this is the basic workflow of Q; tables are created as modifications of existing tables).
 - Click on the blue menu/box, which currently says q8, and select Unaided Awareness.
- Type age into the light brownish menu, which currently displays SUMMARY, and select Age. Note that interesting results are highlighted (these are the results of automatic statistics tests).
- To show the number of observations in each table cell, right-click on the table and select Statistics – cells > n.
Filtering the data
Q has several different tools for creating the filters. To filter a table only to show the data of males in full-time work:
- Press to duplicate the current table.
- Follow the steps in #Creating a crosstab and create a crosstab of Gender by Work status.
- Select the cell that corresponds to males in full-time work. (More generally, select the applicable cells.)
- Right-click and select Create filter.
- Enter the name of Working Men and press OK. You have now created a filter, but we need to apply it.
- Click back on the table showing unaided awareness by age.
- Click on the Filter drop-down menu on the bottom left of the screen and select Working Men.
To modify or create a more complicated filter, press the yellow F at the bottom left of the screen, right-click, and select Edit Variable.
Merging Categories and Creating NETs
To create a proportion of people that said they Strongly agree or Agree a little with the statement Technology is fascinating:
- Click on the Attitudes table.
- Click on Strongly Agree and drag it to the top of Agree a little.
Alternatively, you can merge the categories by selecting them from the table, right-clicking, and selecting Merge.
To create a NET:
- Select Strongly Agree and Agree a little
- Right-click > Create NET.
- Input the desired label > OK.
Rebasing tables
Re-basing involves recomputing the percentages on the table with some categories removed. In the above example, the total sample size is 498, which includes two people who said DON'T KNOW. A more helpful calculation of NET AGREE would remove these two respondents. This is done in Q as follows:
- Right-click on DON'T KNOW.
- Select Remove.
Charts
A crosstab can be shown as a chart by clicking “Show Data as’ (top-middle of the screen) and selecting the desired chart type.

Changing metadata
This example shows how to change data from appearing as categorical to instead appearing as numeric:
- Select the table showing How many SMS sent in typical week.
- Right-click on the table > Question name (How many SMS sent in typical week) > Restructure Data > Average (Number).
Computing minimums, medians and maximums
- Select a table showing an average (e.g., see the previous section).
- Right-click > Statistics – Cells.
- Hold down the CTRL on your keyboard.
- Select Minimum, Median, Minimum.
Recoding numeric data
In the above example, the Minimum and Maximum range go from 0 to 200 calls per week with a median of 3. This suggests that only a very small number of respondents have given high ratings, and it may be advantageous to recode some of the higher values to lower values (so that they become less influential as outliers. To do this:
- Select a table containing the data we wish to recode.
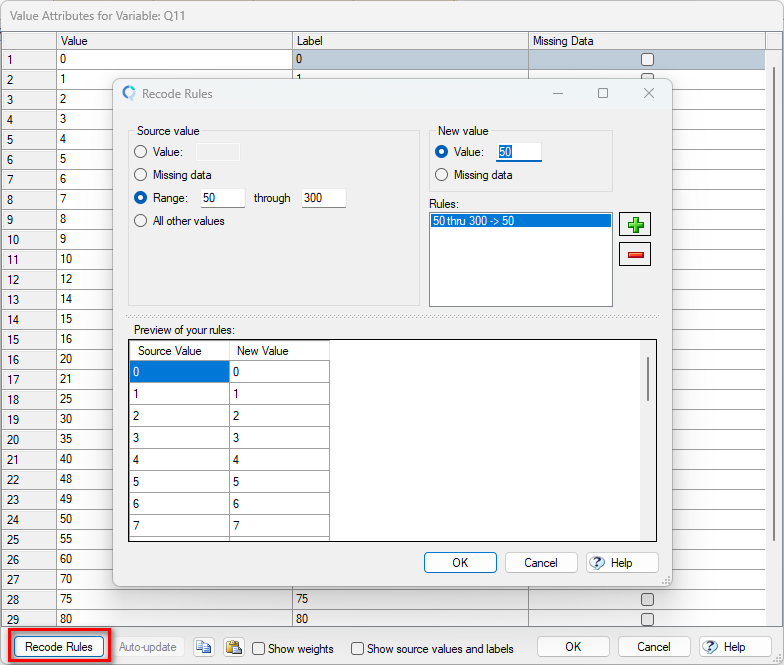
- Right-click on the table column header and select Values…
- Select Recode Rules in the bottom left corner of the Value Attributes menu.
- Set Range to 50 through 300.
- Set the New value to 50 and select + (see image below) > OK.
Note that the Maximum Value in the table now appears as 50.
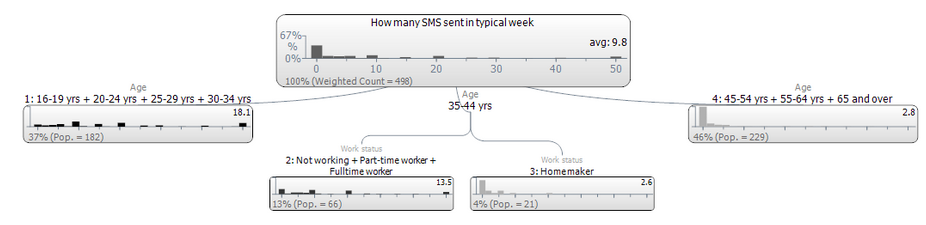
Simple predictive model
This example predicts the number of SMS (text messages) by demographics, assuming that you have recoded the data as numeric (see the previous section):
- The first step depends on which version of Q you are using:
- In newer versions, go to Create > Classifier > Mixed-Mode Trees.
- In older versions of Q, go to Create > Segments and select splitting by questions (tree).
- Select the questions to be used to form the segments in the Questions to analyze dialog box. Select How many SMS sent in typical week.
- Select the predictor variables in the lower box (that is, the box below the box for Questions to analyze). Select Work status, Occupation, and Age.
- Select OK. You should get a tree that looks like this:
Creating market segments
To create some market segments using Latent Class Analysis:
- Go to Create > Segments > Latent Class Analysis.
- Select the questions to be used to form the segments in the Questions to analyze dialog box and select OK.
Exporting and sharing results
The project can be exported to Excel, PowerPoint (including editable charts), PDF, or Word. To export the outputs, select them, right-click > Export to Office or Export to PDF. Alternatively, you can trigger the export by clicking on the icon in the toolbar.